I love eating paneer (fresh Indian cheese) in any form. One of the forms is this masala paneer. It’s basically raw paneer infused with herbs and spices at the time of setting. I’m happy to be sharing this recipe with you today. Because this is one of the easiest DIY food projects you’ll ever do in your kitchen. Deliciously soft, fresh, creamy, and flavorful this masala paneer is a lovely treat for the taste-buds and appetite. Serve as an evening snack or starter for a small gathering.
You must check the process of making masala paneer in my video.
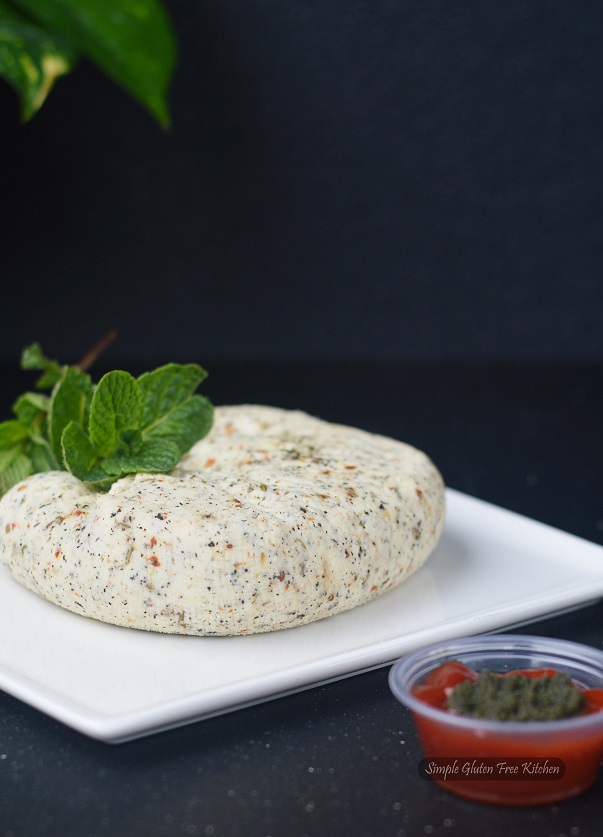
Infusing paneer with herbs and spices is very simple. There are so many variations, you can mix & match the spices and herbs, and make your own version. My recipe contains a blend of coriander seeds, red pepper flakes, fennel seeds, black peppercorns, salt, and mint powder. I dry my own mint. Yes, mint leaves can be dried and used in a variety of ways. For the best flavor preservation, dry them naturally in shade. The process is very easy. I have shared a video on my YouTube channel. I hope you can check it out.
There are three main steps involved in making masala paneer.
Making Herb n spice mix- Toast whole spices in a dry skillet until aromatic. Grind in a mortar and pestle. Add red pepper flakes, mint powder (rub the dried mint leaves between your palms to crush), and salt.
Boiling & Curdling the Milk- Add milk to a pot and bring it to a rolling boil. Once boiling, turn off the heat. Add the curdling agent (lemon, yogurt or vinegar) and let the milk curdle. My preference is to use lemon juice.
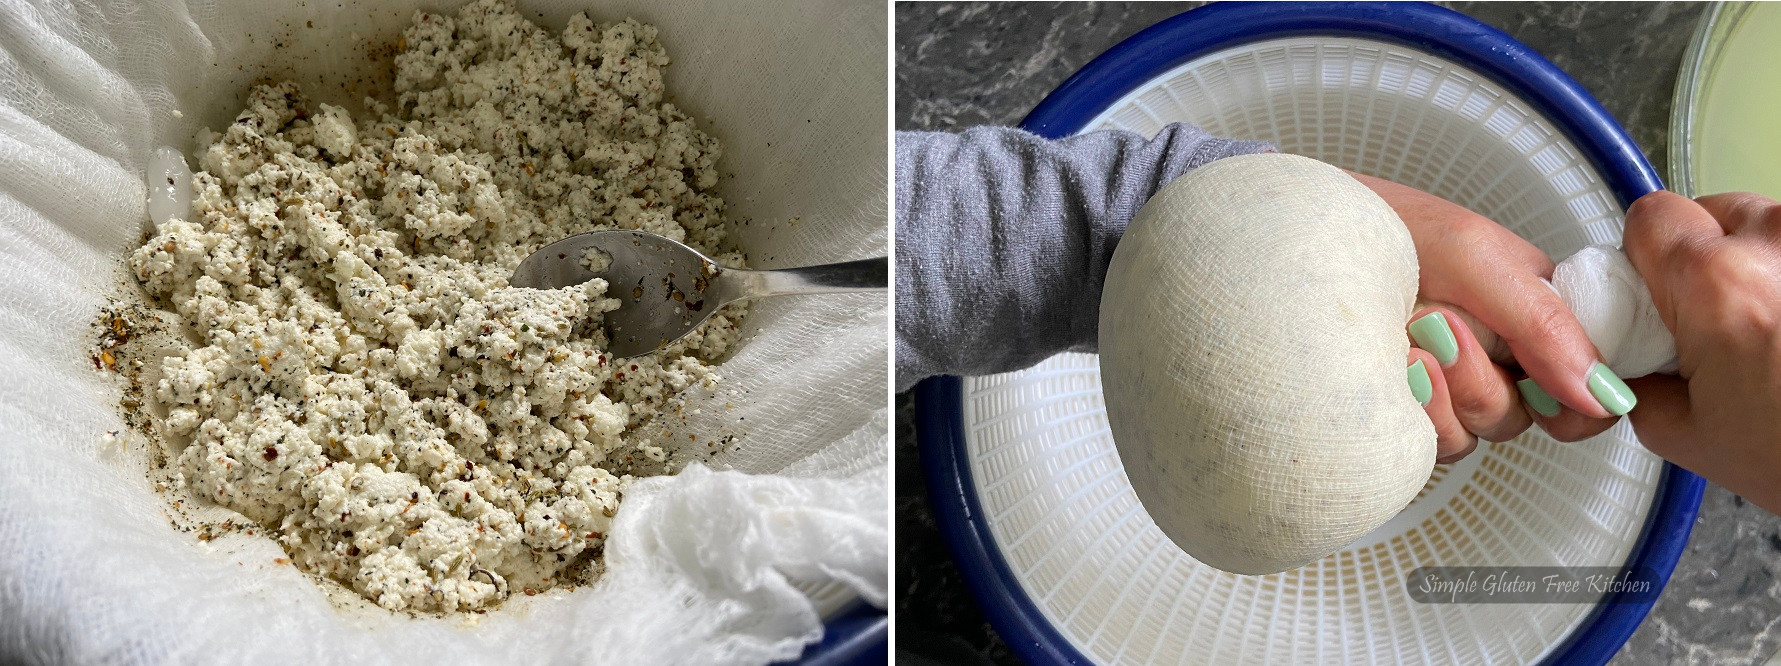
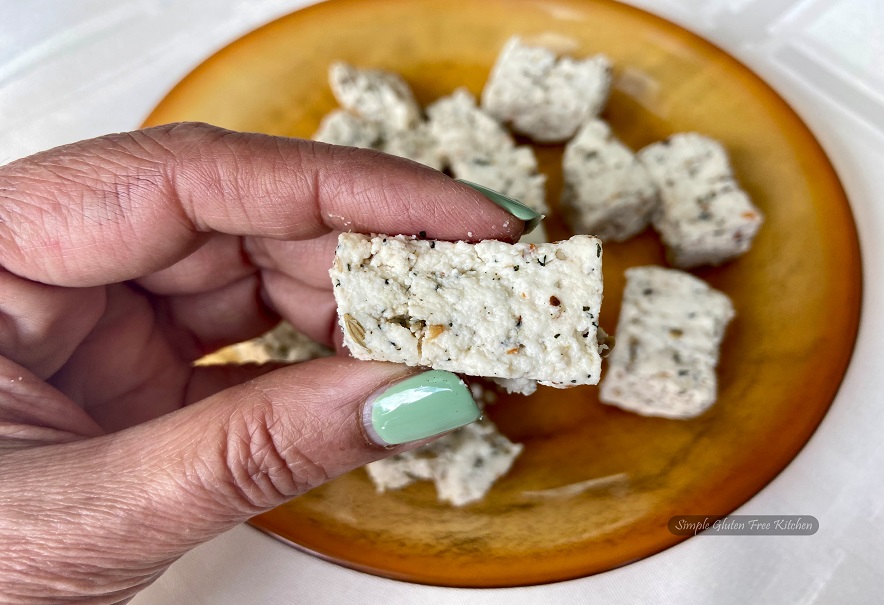
Draining and Pressing the Milk Curds – Drain the curds using a cheesecloth. Mix in the herb and spice mixture, and rinse with fresh water. When it’s cool enough to touch, tie up the curd, squeeze excess whey, then weigh down the curds to form a block. Cut in whatever shapes you want.
Like most fresh cheeses, masala paneer can be eaten just as it is or used as an ingredient in a recipe. I particularly love tossing into salads, in sandwiches, and serving as part of snacking board.
Storing Masala Paneer
Masala paneer cubes will last up to a week if refrigerated in a container. If storing the paneer block then wrap it in moistened muslin cloth before placing it in a container.
Masala paneer freezes beautifully. Make sure to freeze it in a Ziploc bag after cutting it into cubes or any shape and thaw in the refrigerator overnight when needed.
Ingredients
- 2 l organic whole milk (unhomogenized if possible)
- 3 tbsp. lemon juice + 1/2 water or 60 ml vinegar
- 3/4 tsp red Chili flakes
- 3/4 tsp black pepper corn
- 1 1/2 tsp coriander seeds
- 1 1/2 tsp fennel seeds
- 1 heaped tbsp dried mint leaves
- Salt 1 1/2 tsp
Instructions
- In a dry skillet toast, fennel seeds, cumin seeds and peppercorns until fragrant.
- Transfer in a mortar. Coarsely grind. Add red pepper flakes, mint powder (rub the dried mint leaves between your palms to crush), and salt. Set it aside until needed.
- Line a colander with moisten butter muslin or several layers of cheesecloth. Set the strainer over a large container to contain the whey.
- In a heavy-bottomed pan heat the milk and stir in short intervals to prevent a skin forming on the top.
- When it comes up to the boil, turn off the heat. Add the diluted souring agent of your choice (lemon juice, vinegar or yogurt) to the milk while stirring gently until all of the milk curdles.
- Strain the curdled mix into the cheesecloth covered strainer.
- Add the spice and herb mixture. Give the curds a good stir. Add ice cold water to bring down the temperature of the paneer to a point where you can handle it with your bare hands.
- Wrap it tightly and place it under a heavy weight (2-3kg ) for 2 hours or so as to allow it to be compressed into a compact slab. I usually place a rolling or cutting board on this with a pot full of cold water on top of that (Check it out here).
- Remove the weight and cut the paneer into the required shapes, such as cubes or small oblongs, and use as desired (You can leave the block in fridge for 1 hour to get neat pieces).
- Store in the fridge up to a week, or freeze, and enjoy.
Notes
The watery part (whey) that separates out after the milk curdles can be used in place of water in the preparation of gravies or dough for making naan, puris and chapatis.
Setting time is not included in the above recipe.
angiesrecipes
I love the idea of adding spices and herbs to plain paneer. This is a very versatile and practical recipe.
Judee
Looks absoultley delicious with all the herbs and I love your green nail polish too.
Tarnjit Hemer
Love your passion for cooking Neetu❤️
EASYFOODSMITH
This looks lovely!
John / Kitchen Riffs
Paneer with herbs and spices? Terrific idea! I’ve never made my own paneer for some reason. Really should — so I can add herbs to the mix. 🙂 Good stuff — thanks.
Pattie
I LOVE paneer, but never thought to add spices to it. That is brilliant!
2pots2cook
It seems like perfect summer light brunch for hot days! Thank you Balvinder!
Swati
Love masala paneer, nicely explained post for the beginners.